Sieve testing
This article outlines the standardized protocol for manual sieve testing, which has been demonstrated to produce results comparable to automated granulometry.[1][2] See Milling. Note that Brewing Forward does not recommend sieve testing—the results are not comparable to recommendations provided by commercial brewers due to the difference in grist composition produced by commercial vs hobby mills.[3]
Materials
- U.S. standard 8" diameter test sieves along with a lid and bottom pan. The most common sieve sizes used are #14, #30, and #60.[4][5][6][7]
- 6 rubber balls, 5/8" diameter (McMaster-Carr sells a 10-pack)
- Scale, accurate to 0.1 g
- Timer
- 1" nylon brush, for cleaning the sieves
Testing method (adapted from the ASBC protocol)
- Record the weight of each sieve and the bottom pan.
- Place 3 rubber balls on sieve #30 and 3 rubber balls on sieve #60.
- Stack all the sieves in order with the lowest number on top. Place the bottom pan under the lowest sieve.
- Measure out 100–130 grams of grain (about 1 cup) and record the weight.
- Mill the sample and then place all of it on the top sieve, and add the lid.
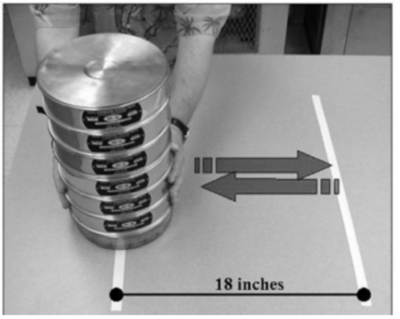
- Shake for 3 minutes, sliding along a smooth surface for 18" per 0.5 seconds, and then reverse the direction (total cycle time is 1 second). After each 15-second interval, tap the pan and sieve stack sharply against a flat surface. The tapping motion should be forceful enough to produce a loud bang.
- Remove the rubber balls and then record the weight of each sieve and the bottom pan. Alternately, you may brush the grain into or onto something else to weigh it.
- Now comes the math... Determine the weight of the grist fraction on each pan by subtracting the weight of each respective empty pan (as previously recorded). Divide each grist fraction by the grist total at the end to obtain a percentage. If the final total is not within 2% of the starting amount that was milled, the test should be redone.
Notes:
- Conditioned grain must be dried with heat (e.g. in an oven at 104°F or 40°C) until the weight is stable before testing.[8] Otherwise the particles may stick together, giving a false reading. The weight of water may also skew the test results.
- The testing sample must be milled by itself. You cannot pull a sample out of a bag or bucket of milled grain for example, because settling has very likely occurred, and it would not give representative results.[9]
- To remove material wedged in the sieve's openings, it is suggested to invert the sieve and brush the underside of the wire mesh gently with a nylon paint brush with bristles cut to a 1" (25.4 mm) length.[9] The side of the sieve frame may be tapped gently with the handle of the brush to dislodge the particles between brush strokes. The sieve openings should be brushed from the underside only with a gentle circular motion. Vigorous brushing may distort the sieve openings and reduce the effective life of the sieve. At no time should a needle or other sharp object be used to remove the particles lodged in the wire mesh. Cleaning sieves with compressed air is not recommended because it can damage the openings on fine mesh, and significantly reduce the accuracy of the sieve. Stubborn particles should be removed in an ultrasonic cleaner only.
- Some amount of error is to be expected. In the ASBC studies, they determined that the reproducibility ranged up to around 16% for manual sieve testing.[2] However, the samples in that trial were obtained from a much larger amount of grist using a sample splitting device, which certainly contributes to some of the variability (which occurs even in testing done with machines).[10] Therefore our testing error is probably lower when good technique is used. For example, if error is around 10%, a #14 sieve fraction result of 50% may actually be within 45–55% approximately.
| Sieve | Opening | Grist fraction |
|---|---|---|
| #14 | 1,400 μm | Husks |
| #30 | 600 μm | Coarse grits, fine husks |
| #60 | 250 μm | Fine grits |
| Pan | None | Flour |
| #14 | #30 | #60 | Pan | |
| Briess suggestion for "trouble-free" lautering | 70–85 | 10–20 | < 10 | < 5 |
| Briess suggestion for "practical" purpose (increased efficiency) | 45–55 | 25–50 | < 10 | < 7 |
| Suggestion from Dave Miller, author of Brew Like a Pro, non-recirculating | 50–60 | 25–32 | 7–11 | 5–10 |
Each batch of malt may require a slightly different gap setting to achieve the optimal profile due to different characteristics among different malts.[6][11] Therefore, one-time testing is insufficient to find the ideal gap setting for all future milling. Periodic monitoring (i.e. sieve testing or visual inspection) is still beneficial, especially when switching malts.
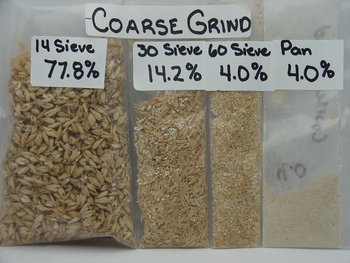
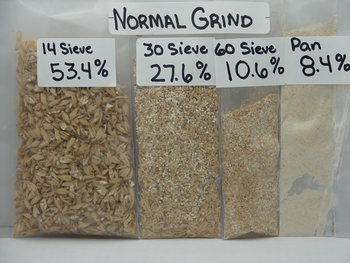
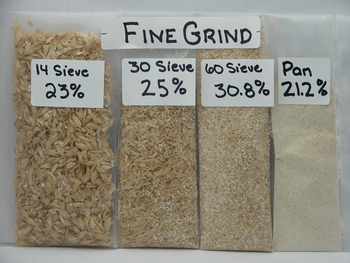
Examples from a Briess presentation:[4]
See also[edit]
- Test sieves
- Milling
- Think like a scientist: Sieve testing (here on Brewing Forward) - An experiment examining whether sieve testing is of any use for home brewers.
References[edit]
- ↑ Malt grist by manual sieve test. J Am Soc Brew Chem. 2003;61(4):246–249.
- ↑ a b c Schwarz P, Barr J, Joyce M, Power J, Horsley R. Analysis of malt grist by manual sieve test. J Am Soc Brew Chem. 2002;60(1):10–13.
- ↑ Bittner A. Think like a scientist: Sieve testing. Brewing Forward website. 2021. Accessed February 2021.
- ↑ a b c Hansen B. Practical milling for the craft brewer. Briess Malt & Ingredients Co. 2007. Accessed 2020.
- ↑ a b Miller D. Mills and milling. Brew Like A Pro website. 2012. Accessed 2020.
- ↑ a b Delucchi V. The perfect crush. Brew Your Own website. 2019. Accessed January 2021.
- ↑ Colby C. Malt sieves — assess your mill output. Beer and Wine Journal website. 2013. Accessed January 2021.
- ↑ Pereira de Moura F, Rocha dos Santos Mathias T. A comparative study of dry and wet milling of barley malt and its influence on granulometry and wort composition. Beverages. 2018;4(51).
- ↑ a b Test sieving: Principles and procedures. Advantech Mfg. 2001.
- ↑ Malt grind by standard sieve test. J Am Soc Brew Chem. 2000;58(4):184–187.
- ↑ Some mill/crushing sieve testing. The Modern Brewhouse website. 2020. Accessed February 2021.


