Wort chilling
Please check back later for additional changes
After the wort is boiled, it needs to be chilled.
The primary goal of chilling is to bring the wort temperature down to where the yeast will be most comfortable, i.e. "pitching temperature".
A secondary goal of chilling is to promote good formation of "cold break" (coagulated lipids and fatty acids). The cold break will eventually settle but at a rate that is too slow for it to be separated from wort without using additional equipment such as a centrifuge or a dedicated settling tank, both of which are rather uncommon in a home brewery. Still, it's important for beer quality and stability that cold break formation happens even if the resulting material is then not physically separated from wort. Cold break formation improves considerably with increasing cooling rate, which means that systems that allow for very high cooling rates such as counterflow chillers are preferrable to slower systems as far as cold break formation is concerned.
Another secondary goal is to minimize oxidation that occurs during the chilling step. This is particularly important for low oxygen brewing and why the chilling step should occur rapidly so that yeast can be pitched as soon as possible. Closed systems such as counterflow chillers are therefore better as far as oxidation is concerned than open systems such as coolships or immersion chillers.
Lastly, brewers should attempt to minimize contamination risk starting with the chilling step, because this is when the wort becomes vulnerable to contamination.
If a partial boil method is being used, the top-up water can be chilled beforehand to aid with the chilling process.
Several methods can be used for chilling wort and they are explained in more detail below.
Passive Chilling AKA "No Chill"[edit]
A brewer with a bare-bones brewing setup may not utilize any chilling method, but rather allow the wort to passively cool over a long period (i.e. over night).
This "no chill" method presents a number of problems:
- Late-boil hop utilization is increased, adding too much bitterness. This can be mitigated to some extent by lowering the amount of late-boil hops or bittering hops.
- Hop flavor is decreased.
- Contamination risk is increased.
- Oxidation is increased.
Despite these problems, this method is used by a small number of home brewers. Some will leave the wort in the kettle until it is sufficiently chilled, while others will transfer it to the fermenter while it is still hot (as long as the fermenter is made from a heat-tolerant material).
Ice Bath[edit]
This method requires minimal investment and is most suitable for relatively small batches like 1-3 gallons.
- Cover the kettle with the lid.
- Put the kettle in a suitably-sized container (e.g. a sink or plastic tub).
- Fill the container with ice.
- Add water. Be careful the water level isn't too high, otherwise the kettle may tip over and/or become submerged.
- Reduce chilling time by gently stirring the wort and also by keeping the ice water moving.
A 1 gallon batch can be chilled quickly in this manner, within 10-15 minutes or so. However this method becomes less viable with larger batches and is awkward if the kettle has valves and other fittings.
(How much ice is needed?)
Sitting the kettle in a snow bank is not a good method of chilling. The tiny amount of snow in contact with the kettle will melt rapidly and then the snow will just insulate the kettle. It will not chill quickly.
Wort Chillers[edit]
Most home brewers use a chilling device (wort chiller) to reduce the time and effort needed for the chilling step on brew day. Four distinct types of wort chillers are available.
Single-stage vs two-stage chilling
Wort chilling typically involves using "ground water" (tap water) to cool the wort most of the way to pitch temperature (or all of the way if your ground water is cold enough depending on your region and the season). Ground water should always be used for the first stage of chilling. However if your ground water is not cold enough to reach the desired temperature and/or you would like to reduce chilling time, a second chilling phase can be utilized. For the second phase, ice water is circulated through the chiller instead of ground water. This requires the use of a pump.
Immersion Chiller, single coil[edit]
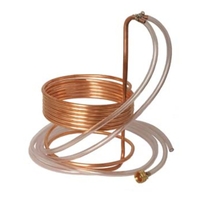
The immersion chiller (IC) is a common entry-level wort chiller due to its low price point and ease of use. Basically a coil of metal tubing (copper or stainless steel) is placed into the kettle containing the hot wort. One end of the tubing is connected to a pressurized water source (e.g. a faucet), and the other side a drain. The flowing water cools by absorbing heat as it flows past the wort. If you do not have access to a faucet or hose connection, you can use a submersible pump in a vessel of water to run the water through the chiller.
Factors that reduce chilling time
- Colder water
- Agitating the wort (e.g. stirring)
- Higher chilling water flow rate
- Copper material transfers heat better than stainless steel
- Longer chiller tubing (in contact with the wort)
Sanitation and cleaning
Typically an IC is sanitized by putting it in the kettle a couple minutes before the end of the boil. It generally doesn't need to be cleaned more than just rinsing after use. Immersion chillers have the advantage the you can visually inspect all the surfaces that will contact the wort.
Connecting the IC
Most ICs include vinyl tubing, which may or may not work fine. Silicone tubing is a good upgrade since it can withstand the high temperature without melting and it's much more flexible at lower temperature. Consider using reinforced (i.e. braided) tubing on the side that connects to a faucet; faucet pressure is generally high enough to burst regular silicone tubing, especially if the flow is blocked/restricted. Many brewers use some type of "quick disconnect" to make brew day easier.
It is important to make sure that the connections do not leak, otherwise tap water may leak into your kettle.
Advanced IC setups
- A 2-stage chilling method is most effective (see above).
- For maximum efficacy, wort can also be "whirl-pooled" in the kettle with the use of a pump instead of manually stirring.
- An IC can be used in conjunction with an ice bath if the kettle and batch size are suitable.
Use of a "pre-chiller" (another IC in an ice bath which feeds into the main IC) is not particularly effective, and therefore not generally recommended. Two-stage chilling is much more effective and costs less money.
Immersion Chiller, multi-coil[edit]
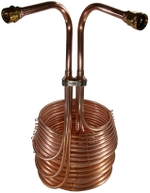
All of the principles of multi-coil immersion chillers are the same as single-coil ICs, but these models have such a dramatically faster chilling rate that they deserve their own category. In fact, these are likely the fastest chillers on the market.
The extremely fast speed can be attributed to a higher water flow rate as well as vastly increased surface area compared to single-coil ICs.
These models are way less likely to leak than standard chillers that just have the hoses clamped onto the metal tubing.
The main downside to using a multi-coil chiller is that they are among the more expensive options for chilling. Keep in mind that these have only become available in stainless steel as of February 2020, which is why many brewers who prefer stainless steel had gone with other options. That's not a reflection on the quality of these chillers.
Counter-flow Chiller[edit]
Counter-flow chillers (CFC) utilize a very efficient method of transferring heat. These chillers are basically a tube inside another tube. Wort flows through the inner tube in one direction, and the chilling water flows through the outer tube in the opposite direction. Some models have features designed to increase the turbulence of the flow, which increases the heat exchange.
Brewers may choose to chill the entire batch all together in the kettle or alternately to direct the chiller outflow to the fermenter as soon as the exiting wort is at the desired pitching temperature.
Factors that reduce chilling time
- Colder water
- Higher chilling water flow rate
- Copper material transfers heat better than stainless steel
- Longer chiller tubing (in contact with the wort)
- Lower wort flow rate will lower the temperature of the wort exiting the chiller. Higher wort flow rate will help chill the whole batch faster.
Sanitation and cleaning
Typically a CFC is sanitized by circulating boiling wort through it for a couple minutes right before the end of the boil.
There is not a consensus on how best to clean a CFC. Many brewers simply flush the inner tube with water after use. Other brewers feel that circulating a cleaning solution is needed (either after every brew or at least periodically). Still other brewers feel that counter-flow chillers are unacceptable altogether because the inner surface that touches the wort cannot be scrubbed or visually inspected (with one exception, see the chiller list below). Regardless, these chillers have been shown in practice not to significantly increase contamination risk since boiling wort is extremely effective at sanitizing the chiller.
Connecting the CFC
The increased setup complexity is one disadvantage of CFCs compared to immersion chillers. Using a pump is highly recommended since it allows recirculation and faster flow rates. However gravity might possibly be used if the brewer can find work-arounds to prevent clogging, although leaving near-boiling wort in the kettle still presents problems with increased hop utilization and decreased flavor/aroma.
The bottom drain on a kettle connects to a pump (via tubing), which then connects to the chiller (via tubing) and from there back into the kettle, or fermenter. Usually wort is returned to the kettle through some kind of whirlpool port or device. This helps form a compact trub cone in the bottom of the kettle and helps to homogenize the temperature of the wort.
Silicone tubing is a necessity because it must withstand the high temperature of boiling wort. The tubing used for the water connections does not need to be silicone, but the flexibility of silicone is still a nice upgrade. Consider using reinforced (i.e. braided) tubing on the side that connects to a faucet; faucet pressure is generally high enough to burst regular silicone tubing if the flow is blocked/restricted. Many brewers use some type of "quick disconnect" to make brew day easier.
Advanced CFC setups
- A 2-stage chilling method is most effective (see above).
- CFCs can be used in series, e.g. one with counter-flow tap water which feeds into a second with counter-flow circulating ice water. CFCs can also be used in parallel to increase chilling speed.
- CFCs can also be used as a heat-exchange during the mash (HERMS) to maintain or increase mash temperature.
Use of a "pre-chiller" (an IC in an ice bath which feeds into the CFC) is not particularly effective, and therefore not generally recommended. Two-stage chilling is much more effective and costs less money.
Plate Chiller[edit]

This type of chiller also utilize the efficiency of counter-current flow. They are constructed with plates that allow wort flow in one direction and chilling water the other direction.[1] Compared to a CFC, the surface area is largely increased, so chilling is more efficient.
Increased length provides for more effective chilling; a longer chiller is more effective than a shorter one with more plates. The reason to get more plates is to have less restriction, which would be helpful when pumping at a high rate, or if you have extremely high water pressure.[1] Otherwise 20 plates should be fine.[2]
The major disadvantage to plate chillers is that they are prone to clogging. Some sort of filter or hop-containment method needs to be used in the boil.[3][4] Because particles tend to get caught inside, they can also be very difficult to clean. A plate chiller generally requires a more intensive cleaning and sanitation regiment. Use with a pump is highly recommended.
For cleaning, plate chillers should be flushed in the opposite direction of the wort flow. Some brewers resort to baking the chiller in the oven to make sure it is fully sanitized. Plate chillers on the commercial level disassemble for cleaning; unfortunately this is not the case with home brew chillers.
Many plate chillers are made of stainless steel, but are brazed with copper. The copper brazing does contact with the wort to some degree, and therefore these chillers are not acceptable to brewers looking to eliminate copper.
All other considerations are the same as for CFCs.
List of Chillers Available[edit]
This is not intended to be a complete list of every chiller available, but rather to provide a representative sample of different options available.
Choosing the Best Chiller for you
Unfortunately, there are not many direct comparisons of chiller effectiveness since many factors come into play such as water temperature, pump flow rate, batch size, etc.[5]
Single-coil immersion chillers should be within budget of most brewers. A good upgrade would be to get a submersible pump and use 2-stage chilling. For brewers with a higher budget, it's difficult to beat the speed and ease-of-use of a multi-coil immersion chiller. CFCs are also reasonably fast and more suiting toward reducing water usage. Relatively few brewers use plate chillers because of the inherent risk of clogging and difficulty cleaning, but they are very effective and a good option if you don't mind using a device to prevent pellet hops from flowing into it.
Stainless steel is preferred for low oxygen brewing and by any other brewers looking to reduce the staling effects of copper. However, copper chillers are faster.
| Type | Copper | Stainless Steel |
|---|---|---|
| Single-coil immersion chiller |
|
|
| Multi-coil immersion chiller |
(This is the only multi-coil SS IC available.) | |
| Counterflow chiller |
|
(These are the only all-SS CFCs available.) |
| Plate chiller |
Actual stainless steel plate chillers are rare and prohibitively expensive. |
Diameters listed as OD (of the inner tubing, if applicable).
DIY Chiller Options[edit]
Home brewing is all about doing it yourself, and wort chillers are one of the easiest pieces of equipment to make yourself, if you have the desire.
Making single coil copper IC is as easy as obtaining a 25- to 50-foot copper coil and bending the ends up so they reach over the edge of your kettle so hoses can be attached. The only tricky part is bending the copper without it kinking.
CuS.S. offers a couple of DIY kits to construct multi-coil copper immersion chillers (or stainless steel if you can somehow bend it), so you can save a bit of money by avoiding labor costs.
There are many examples of various types of chillers that people have built from scratch:
- Immersion chiller build on homebrewtalk.com and another
- Stainless steel CFC build on homebrewtalk.com
- Copper CFC build on homebrewtalk.com and here as well
- JaDeD Cyclone "clone" on homebrewtalk.com
Strategies to Reduce Water Usage[edit]
Many brewers will collect the first 5-10 gallons of chilling water in a bucket (the initial water will be the hottest) and use it for cleaning.
Science[edit]
Newton's law of cooling:
The rate of heat loss of a body is directly proportional to the difference in the temperatures between the body and its surroundings, and is also directly proportional to the heat transfer surface area.[7]
For laminar flow, the heat transfer coefficient is rather low compared to turbulent flow; this is due to turbulent flows having a thinner stagnant fluid film layer on the heat transfer surface.
By looking at the thermal conductance of different materials, we can see the difference on how easily that material conducts heat. Copper conducts heat about 20 times the rate of stainless steel. However in practice copper doesn't allow 20 times faster chilling, so it is obviously not the rate limiting condition.
For process heat transfer, only conduction and convection are important because radiation is minimal at the temperatures used in brewing.[8] see section 11.2 Wort cooling requires rapid changes in temperature and, therefore, efficient heat transfer is of major importance. Heat transfer (Q) is a function of surface area, driving force (temperature gradient), and resistance to driving force (thermal conductivity), and is defined as: Q = U × A × ∆T where U is the overall heat transfer coefficient (kW/m2K), A is the surface area (m2), and ∆T is the overall temperature difference (K). This means the greater the transfer coefficient (U), the lower the resistance to heat transfer.[8]
Preventing excessive trub carryover helps reduce the negative impact of lipids in the beer.[9]
- Break material contains lots of oxidized compounds (most notably lipids), that can cause off-flavors in the beer.[10] Since unsaturated fatty acids are always present in malt, their oxidation can only be prevented by the strict avoidance of oxygen.[11] The amount of free fatty acids in the wort can also be reduced by lautering clear wort into the kettle and good trub sedimentation after the boil.[12]
There has been much debate about the relative advantages of using turbid (lipid-rich) worts or bright (lipid-depleted) worts, with some commentators recommending the use of turbid or trub-rich worts (trub being a precipitation product produced during wort boiling) for their positive influence on fermentation, while others have advised against its use, primarily due to the potential negative effects on flavor profile and stability. Numerous reports have shown improved fermentation performance with worts containing high levels of malt-derived solids due to improved yeast growth and viability, faster fermentation, increased uptake of wort nitrogen and higher ethanol yields. Conversely, one study has associated high gravity wort turbidity with reduced yeast growth, lower rates of attenuation and reduced uptake of FAN at both a laboratory and industrial scale.[13] It has been suggested that the use of cloudy wort improves yeast fermentation performance, not through any nutritional effect of the lipids but, rather, through solid particles acting as nucleation sites for CO2 bubble formation121,188. The rationale is that the resultant wort contains less dissolved CO2, which would otherwise have an inhibitory effect on yeast performance. However, Stewart and Martin196 found that the use of turbid wort improved fermentation performance over and above that seen in clear wort containing diatomaceous earth as a CO2 nucleation factor, despite the reductions in dissolved CO2 being identical in both cases. These results have been confirmed by Kühbeck et al.112 who noted an increase in fermentation performance in the presence of trub, which could not be matched by the addition of other particles, including PVPP, kieselguhr and activated carbon. Improved fermentation performance in trub-rich wort may also be influenced by the presence of bound ionic metals such as Cu or Zn, which otherwise may be lost through clarification108,111,121,184,188. The principal objection to the use of turbid worts for fermentation relates to potential flavour effects. One of the main effects of malt-derived wort lipids on flavour profile is the effect on ester synthesis by the yeast cells, with reductions observed in the majority of studies111,121,158,184,196. A probable reason for this reduction in ester synthesis may be repression of the ATF genes7,72,73,133,213, which encode alcohol acetyltransferases and have a major role in ester synthesis218. Esters typically impart a fruity or floral aroma to beers and whether a reduction in concentration is deemed desirable or not depends on the specifications of the particular beer. Indeed, Booer et al.26 have suggested that lipid supplements derived from spent grains may be useful in removing undesirable estery notes in beer. Overproduction of esters typically occurs during high gravity fermentation7,140. Wort lipid modification through, for example, trub addition may have application in decreasing the disproportionate production of esters. Ester synthesis is known to be reduced by excess oxygen7 and solubility of oxygen is reduced at higher gravities14. These facts may, in part, explain the higher production of esters during high gravity brewing. Lipids in fermentation wort may also have a more direct effect by imparting caprylic (soapy) notes to the flavour/aroma profile42,227, though this characteristic is associated with medium chain-length fatty acids and may in fact be ameliorated through the addition of longer chain fatty acids to the wort or by wort oxygenation136. Shorter chain fatty acids may accumulate during fermentation due to the increased permeability of the yeast cell wall and contribute to stale or ‘yeasty’ characters in beer137,206. Such increased membrane permeability may arise as a result of the greater stresses to which the yeast cell is exposed during HG and VHG fermentations (discussed in further detail below). The formation of vicinal diketones (VDK) is known to correlate with a number of factors, including the presence of trub, which promote faster yeast growth and nitrogen uptake during fermentation152. This is, however, by no means guaranteed and Lentini et al.121 observed no change in the concentration of diacetyl (2,3 butanedione), while Schisler et al.184 noted a decrease in the total VDK levels in trub-rich wort. Other effects of malt-derived fatty acids are increases in the concentration of higher alcohols including iso-butanol184,196 and propanol, 2-methylbutanol and 3-methylbutanol196, while lower acetaldehyde concentrations have been recorded111,184. The presence of fatty acids in beer is typically associated with decreased flavour stability158 and it has been suggested that the staling factor 2-trans-nonenal, which gives a distinctive cardboard taste to beer at very low concentrations141, may arise through the oxidation of linoleic acid in beer61,62,107. Once again, the findings of studies investigating the relationship between lipid availability and flavour development are not unequivocal and some investigations have also found that the use of turbid wort offers no disadvantages in terms of flavour profile and stability in comparison to clear worts, and beers produced by the fermentation of very clear worts have actually rated poorly in taste tests111,186. Likewise, Kühbeck et al.111 found that foam stability of the beers produced at pilot scale with turbid wort was not different to those produced from clear wort. A number of factors must be considered before a brewer should choose a more or less clear wort. Turbid lautering may, for example, reduce the time taken to produce wort for fermentation111, but may require more time to be spent on filtration and on cleaning of pipe lines and filters post fermentation. It is likely that optimum lipid levels exist for individual fermentation processes and yeast strains and these need to be determined empirically2 . An interesting experimental approach might be the collection of trub after wort boiling and enzymatic fractionation and solubilisation of this trub before reintroduction of the individual fractions to the fermentation wort. This would, firstly, allow for the assessment of the effect of trub on fermentation performance without the effect of solid particle addition needing to be considered. Secondly, the effect of the respective components (e.g., UFA, sterol, bound ions etc.) could be determined.
See also[edit]
Potential sources
- http://brewlikeapro.net/heatexchangers.html
- https://www.themodernbrewhouse.com//forum/viewtopic.php?f=18&t=2275
- https://www.tandfonline.com/doi/abs/10.1094/ASBCJ-58-0101
References[edit]
- ↑ a b "Stainless Steel Copper Brazed Plate Heat Exchangers." Duda Diesel. Accessed March 2020.
- ↑ "Which is more efficient? Plate Chiller or Counterflow?" homebrewtalk.com 2020.
- ↑ https://www.homebrewtalk.com/forum/threads/plate-chiller-clogging.649136/
- ↑ https://www.homebrewtalk.com/forum/threads/clogging-up-the-plate-chiller.303704/
- ↑ "Chiller Showdown: Blichmann Therminator vs JaDeD Brewing Cyclone." homebrewtalk.com 2016.
- ↑ "Kegco Stainless CFC Fittings." homebrewtalk.com 2018.
- ↑ "Newton's law of cooling." Wikipedia, The Free Encyclopedia. 2020.
- ↑ a b Miedl-Appelbee M. Brewhouse technology. In: Stewart GG, Russell I, Anstruther A, eds. Handbook of Brewing. 3rd ed. CRC Press; 2017.
- ↑ Golston AM. The impact of barley lipids on the brewing process and final beer quality: A mini-review. Tech Q Master Brew Assoc Am. 2021;58(1):43–51.
- ↑ Kunze p. 214
- ↑ Kunze p. 233
- ↑ Kunze p. 233
- ↑ Gibson BR. 125th anniversary review: improvement of higher gravity brewery fermentation via wort enrichment and supplementation. J Inst Brew. 2011;117(3):268–284.